
Back to school. I can’t believe I said that. If you are a teacher, like me, you can’t believe that fall is around the corner and that we will be back in class very soon. If you are visiting this site for the first time, you will notice that this blog has a focus on food and learning, often both at the same time. This is a repost of an article I wrote a couple of years ago. If your fall is CRAZY, remember that you need to take care of yourself, too. Plan to get out and learn something new this fall. Some of you may have an interest in taking a course on food photography.
The workshop described in this post is offered again on Saturday, October 3rd, 2015. Visit the link provided, for more information and to register.
[Repost from November 14, 2013]
This past weekend, I had an opportunity to learn from food photographer, Lauren Cheong, who led a workshop at GTA Photography, here in Toronto.
GTA Photography holds its classes in a beautiful, airy space near the St. Lawrence market. Our small group sat in comfy couches for an introductory theory lesson, covering the basics of lighting, composition and styling for food photography. We watched slides on a flat-screen monitor and felt comfortable to ask our questions, no matter how basic.
The workshop was on a Sunday afternoon, which permitted us to shoot in natural light. Overcast skies allowed just the right kind of light through the large windows of the studio: dispersed and not too bright. In short order, we were experimenting with what we had just learned, using props, fruits and dried pasta which were provided by Lauren.

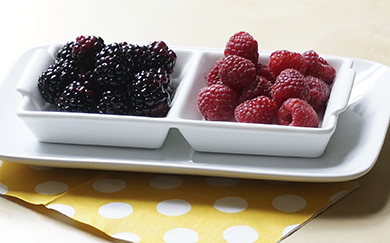
Lighting
This is shot from the side, using natural window light. The shadows in the first photo are a bit harsh, and could be softened by using a reflector opposite the window. If you can get highlights on berries or other dark objects, it creates depth. Dark objects are very hard to shoot.
Now have a look at how much softer the shadows appear when a reflector is used opposite the window, to reflect light back into the set.

Composition
Shallow depth of field is often used to ensure that only the “hero”, which is the best specimen, is in focus. The additional items in the set are there to create visual interest, and to keep us looking around the shot at the story being told.
A shallow depth of field can be created by zooming in on the subject, or by using a large aperture. In this particular shot, I should never have had the lime “butt” facing the camera (unattractive, wouldn’t you agree), but at least the hero lemon is in focus in the foreground. The shadows could be softened a bit better with a reflector, although I am happy with the highlights on the fruit.

Styling
Make sure your set tells a story that makes sense. For example, if you are photographing a cut grapefruit, you might include a knife and/or a spoon, but a fork would not make sense. If you lack props, Lauren reminded us that the props must not be the centre of attention when photographing food. She also gave us some local suggestions for renting props. This is one of the benefits of going to a workshop with an expert in your community.
If you have mastered the basics of manual settings on your DSLR, and have an interest in food photography for any purpose, I would highly recommend this workshop.

